No edit summary Tag: Source edit |
No edit summary |
||
| (52 intermediate revisions by 21 users not shown) | |||
| Line 9: | Line 9: | ||
{{quote|In Support mode, this balanced robot is able to move fast around the battlefield, repairing itself and nearby allies. When in Assault mode, it increases its own combat efficiency and defenses}} |
{{quote|In Support mode, this balanced robot is able to move fast around the battlefield, repairing itself and nearby allies. When in Assault mode, it increases its own combat efficiency and defenses}} |
||
<br /> |
<br /> |
||
| + | {{Quick Nav|Prev = Loki|Next = Fenrir}} |
||
| − | |||
{{Unit Page Top |
{{Unit Page Top |
||
| + | |ID = 53 |
||
|Prev Unit = Loki |
|Prev Unit = Loki |
||
|Unit Name = Tyr |
|Unit Name = Tyr |
||
|Next Unit = Fenrir |
|Next Unit = Fenrir |
||
| − | |Mainpic = |
+ | |Mainpic = Tyr.png |
| − | |Cost = 10,000 {{Cp icon}} or<br> |
+ | |Cost = 10,000 {{Cp icon}} or<br>9,500 {{Au icon}} |
| − | |Value = $ |
+ | |Value = $95 |
|Rlevel = 20 |
|Rlevel = 20 |
||
|Class = [[File:MediumRobotinfobox.png|50px|link=]]<br>[[Medium Robot|Medium]] |
|Class = [[File:MediumRobotinfobox.png|50px|link=]]<br>[[Medium Robot|Medium]] |
||
|Ability = [[File:TyrAssaultModeinfobox.png|32px|link=]]<br>[[Abilities#Shapeshift|Shapeshift]] {{Info-Tooltip|Ability Tooltip}} |
|Ability = [[File:TyrAssaultModeinfobox.png|32px|link=]]<br>[[Abilities#Shapeshift|Shapeshift]] {{Info-Tooltip|Ability Tooltip}} |
||
| − | |Faction = [[File:Evolifeinfobox.png|36px|link=]]<br>[[ |
+ | |Faction = [[File:Evolifeinfobox.png|36px|link=]]<br>[[Factions#EvoLife|EvoLife]] |
|Level = 1 |
|Level = 1 |
||
|Hit Points = 104,000 |
|Hit Points = 104,000 |
||
|Speed = 36 kph |
|Speed = 36 kph |
||
|Hardpoints = 2× [[Light]] + 2x [[Medium]] |
|Hardpoints = 2× [[Light]] + 2x [[Medium]] |
||
| − | |Tier = |
+ | |Tier = III |
|WikiClass = Medium |
|WikiClass = Medium |
||
| + | |Role = [[Roles|Support]] |
||
|Paint = [[File:Tyr DEFAULT.png|60px|Default]] |
|Paint = [[File:Tyr DEFAULT.png|60px|Default]] |
||
|Paint2 = [[File:Tyr TSUNAMI.png|60px|Tsunami|link=Paint_Jobs#Tsunami]] |
|Paint2 = [[File:Tyr TSUNAMI.png|60px|Tsunami|link=Paint_Jobs#Tsunami]] |
||
| − | |Paint3 = |
+ | |Paint3 = [[File:Tyr FIXER.png|60px|Fixer]] |
| − | |Paint4 = |
+ | |Paint4 = [[File:Tyr NOVUM.png|60px|Novum]] |
|Paint5 = |
|Paint5 = |
||
|LegendPaint = [[File:Tyr TSUNAMI.png|60px|Tsunami|link=Paint_Jobs#Tsunami]] |
|LegendPaint = [[File:Tyr TSUNAMI.png|60px|Tsunami|link=Paint_Jobs#Tsunami]] |
||
| + | |LegendPaint2 = [[File:Tyr FIXER.png|60px|Fixer]] |
||
| + | |LegendPaint3 = [[File:Tyr NOVUM.png|60px|Novum]] |
||
|ActiveModule = Yes |
|ActiveModule = Yes |
||
|PassiveModule = 3 |
|PassiveModule = 3 |
||
| + | |Pilot = {{Pilot Tooltip|Sigrun Valka}} |
||
| − | |Pilot = [[File:Pilot_legend_sigrunvalka_mini.png|Sigrun Valka|50px|link=War_Robots_Wiki:Legendary_Pilot_List#Sigrun_Valka]] |
||
|Weapons = 2× [[Punisher]] + 2x [[Punisher T]] |
|Weapons = 2× [[Punisher]] + 2x [[Punisher T]] |
||
|Currency = {{Cp}} |
|Currency = {{Cp}} |
||
| Line 51: | Line 55: | ||
{{Tocright}} |
{{Tocright}} |
||
==Introduction== |
==Introduction== |
||
| − | '''Tyr''' is a [[Medium Robot|medium robot]] with 2 [[Medium |
+ | '''Tyr''' is a [[Medium Robot|medium robot]] with 2 [[Medium|medium]] and 2 [[Light|light]] hardpoints. |
==Ability== |
==Ability== |
||
| + | The Tyr's ability is called '''Shapeshift.''' Upon activation, the Tyr toggles its mode. The Tyr has two modes: Support Mode and Assault Mode. |
||
| ⚫ | |||
| ⚫ | Upon activation of the Support Mode the Tyr sends out a single repair impulse (akin to the [[Mender]]) that instantly repairs itself and all ally robots within 75 meters a fixed amount (based on the Tyr's level) of durability. While in Support Mode the Tyr deploys a repair aura (akin to the [[Weyland]]) allowing it to heal both itself and allies (within 75 meters) slowly over time, while also granting this robot a speed boost of +15 km/h. However, its light weapons are disabled and fold back (cannot be fired). |
||
| ⚫ | |||
| + | |||
| ⚫ | |||
==Strategy== |
==Strategy== |
||
| − | Since Tyr has the ability to heal itself and allies it is recommended to stay close to teammates. Overall, the Tyr is capable of filling multiple roles but it best used as a close range support bot or brawler to make full use use of its physical shield, firepower, and repairing capabilities to both heal itself and allies. |
+ | Since Tyr has the ability to heal itself and allies it is recommended to stay close to teammates. Overall, the Tyr is capable of filling multiple roles but it best used as a close range support bot or brawler to make full use use of its physical shield, firepower, and repairing capabilities to both heal itself and allies. With 2x [[Medium|medium]] and 2x [[light]] hardpoints the Tyr can also do well for mid-range support and skirmishing. |
A good strategy that should be employed is to serve as the leader of a mobile strike team, ideally consisting of other robots that will provide useful to the team, such as [[Hades]] or [[Blitz]]. When in combat, the player should activate Assault Mode to utilize the physical shield in order to protect the hull of the Tyr, not to mention the extra firepower. Once the skirmish is over, however, Tyr should return to Support Mode to heal itself and the other members of the strike team. |
A good strategy that should be employed is to serve as the leader of a mobile strike team, ideally consisting of other robots that will provide useful to the team, such as [[Hades]] or [[Blitz]]. When in combat, the player should activate Assault Mode to utilize the physical shield in order to protect the hull of the Tyr, not to mention the extra firepower. Once the skirmish is over, however, Tyr should return to Support Mode to heal itself and the other members of the strike team. |
||
| + | '''Important:''' A very easy way to maximize healing power is to constantly toggle the ability change, as the explosive repair pulse created while changing into Support Mode can heal ''faster'' than staying in Support Mode! While it generally means your Tyr is slower if moving (due to the time spent in Assault Mode), spamming Shapeshift heals much faster than slowly waiting for the repair aura to heal you and your allies up. |
||
| ⚫ | Note: The Tyr's built-in physical shield can still take damage even when inactive |
||
| ⚫ | Note: The Tyr's built-in physical shield can still take damage even when inactive due to the fact the shield doesn't retract into the robot's hull. The shield most likely can take damage from area of effect (splash) weapons when inactive, however, in rare instances it can take damage from any weapon type if shot at the correct angle. |
||
| ⚫ | |||
| + | |||
| ⚫ | |||
==Possible Setups== |
==Possible Setups== |
||
| Line 72: | Line 80: | ||
'''Note''': When "Opt." is next to a slot type, it refers to one of the multiple options that can be used in combination with the other weapon(s) slot type(s). |
'''Note''': When "Opt." is next to a slot type, it refers to one of the multiple options that can be used in combination with the other weapon(s) slot type(s). |
||
| − | Each slot type is filled with only one particular weapon. For example, if a robot has 3 light all three of |
+ | Each slot type is filled with only one particular weapon. For example, if a robot has 3 light all three of those slots are filled with Pinatas, as mixing weapons of the same slot type is usually not advisable. |
However, utility weapons can be effectively mixed with standard weaponry, for example the [[Halo]] (a [[War Robots Wiki:Weapon Mechanics#Root|root]] weapon) could be used on one light slot, and a Gust on another. This is because weapons such as the Halo give up firepower for the utility of locking down enemies. |
However, utility weapons can be effectively mixed with standard weaponry, for example the [[Halo]] (a [[War Robots Wiki:Weapon Mechanics#Root|root]] weapon) could be used on one light slot, and a Gust on another. This is because weapons such as the Halo give up firepower for the utility of locking down enemies. |
||
| Line 81: | Line 89: | ||
{|border="1" |
{|border="1" |
||
|- |
|- |
||
| − | |'''Slot Types |
+ | |'''Slot Types '''→ |
| − | |'''Medium Slot |
+ | |'''Medium Slot '''↓ |
| − | |'''Light Slot<br />(Opt. 1) |
+ | |'''Light Slot<br />(Opt. 1) '''↓ |
| − | |'''Light Slot<br />(Opt. 2) |
+ | |'''Light Slot<br />(Opt. 2) '''↓ |
| − | |'''Light Slot<br />(Opt. 3) |
+ | |'''Light Slot<br />(Opt. 3) '''↓ |
| |
| |
||
|- |
|- |
||
| − | |'''#Slots |
+ | |'''#Slots '''→ |
|x2 |
|x2 |
||
|x2 |
|x2 |
||
| Line 94: | Line 102: | ||
|x2 |
|x2 |
||
| |
| |
||
| − | |'''Name |
+ | |'''Name '''↓ |
|- |
|- |
||
| − | |'''Setup 1 |
+ | |'''Setup 1 '''→ |
|{{Setup|"Orkan"}} |
|{{Setup|"Orkan"}} |
||
|{{Setup|"Pinata"}} |
|{{Setup|"Pinata"}} |
||
| Line 104: | Line 112: | ||
|Death Button (Opt. 1) |
|Death Button (Opt. 1) |
||
|- |
|- |
||
| − | |'''Setup 2 |
+ | |'''Setup 2 '''→ |
|{{Setup|"Taran"}} |
|{{Setup|"Taran"}} |
||
|{{Setup|"Magnum"}} |
|{{Setup|"Magnum"}} |
||
| Line 112: | Line 120: | ||
|Plasma Death Button (Opt. 1) |
|Plasma Death Button (Opt. 1) |
||
|- |
|- |
||
| − | |'''Setup |
+ | |'''Setup 3 '''→ |
|{{Setup|"Punisher T"}} |
|{{Setup|"Punisher T"}} |
||
|{{Setup|"Punisher"}} |
|{{Setup|"Punisher"}} |
||
| Line 136: | Line 144: | ||
|Freezing Death Button |
|Freezing Death Button |
||
|- |
|- |
||
| − | |'''Setup 5 |
+ | |'''Setup 5 '''→ |
| |
| |
||
{{setup|"Igniter"}} |
{{setup|"Igniter"}} |
||
| Line 153: | Line 161: | ||
{|border="1" |
{|border="1" |
||
|- |
|- |
||
| − | |'''Slot Types |
+ | |'''Slot Types '''→ |
| − | |'''Medium Slot |
+ | |'''Medium Slot '''↓ |
| − | |'''Light Slot (Opt. 1) |
+ | |'''Light Slot (Opt. 1) '''↓ |
| − | |'''Light Slot (Opt. 2) |
+ | |'''Light Slot (Opt. 2) '''↓ |
| − | |'''Light Slot (Opt. 3) |
+ | |'''Light Slot (Opt. 3) '''↓ |
| − | |'''Light Slot (Opt. 4) |
+ | |'''Light Slot (Opt. 4) '''↓ |
|- |
|- |
||
| − | |'''#Slots |
+ | |'''#Slots '''→ |
|x2 |
|x2 |
||
|x2 |
|x2 |
||
| Line 166: | Line 174: | ||
|x2 |
|x2 |
||
|x2 |
|x2 |
||
| − | |'''Name (If Applicable) |
+ | |'''Name (If Applicable) '''↓ |
|- |
|- |
||
| − | |'''Setup 1 |
+ | |'''Setup 1 '''→ |
|{{Setup|"Scourge"}} |
|{{Setup|"Scourge"}} |
||
|{{Setup|"Spark"}} |
|{{Setup|"Spark"}} |
||
| Line 176: | Line 184: | ||
| |
| |
||
|- |
|- |
||
| − | |'''Setup 2 |
+ | |'''Setup 2 '''→ |
|{{Setup|"Pulsar"}} |
|{{Setup|"Pulsar"}} |
||
| − | |{{Setup|" |
+ | |{{Setup|"Magnetar"}} |
|{{Setup|"Halo"}} |
|{{Setup|"Halo"}} |
||
|{{Setup|"Marquess"}} |
|{{Setup|"Marquess"}} |
||
| Line 187: | Line 195: | ||
| |
| |
||
|- |
|- |
||
| − | |'''Setup 3 |
+ | |'''Setup 3 '''→ |
|{{Setup|"Tulumbas"}} |
|{{Setup|"Tulumbas"}} |
||
|{{Setup|"Pin"}} |
|{{Setup|"Pin"}} |
||
| Line 200: | Line 208: | ||
===Overview=== |
===Overview=== |
||
| + | Recommended equipment includes: |
||
| ⚫ | |||
| + | * 2x [[Scourge]]/2x [[Spark]] |
||
| + | * 2x [[Corona]]/2x [[Halo]] |
||
| + | * 2x [[Magnetar]]/2x [[Pulsar]] or [[Marquess]] |
||
| ⚫ | |||
| − | ==Mark I Statistics== |
||
| − | {{Robot Upgrades |
||
| − | |additional-columns = 3 |
||
| − | |mark-2 = false |
||
| − | |purchase-currency = {{Table Currency|"Au/Cp"}} |
||
| − | |custom-ico-1 = [[File:PhysicalShield icon.png|32px|link=]] |
||
| − | |custom-title-1 = Physical Shield |
||
| − | |custom-ico-2 = [[File:SelfRepairinfobox.png|40px|link=]] |
||
| − | |custom-title-2 = Repair (per second) |
||
| − | |custom-ico-3 = [[File:SelfRepairinfobox.png|40px|link=]] |
||
| − | |custom-title-3 = Repair Impulse |
||
| − | |1|104,000|78,000|987|8,200|36|10,000 {{Cp icon}} or 14,000 {{Au icon}} |
||
| − | |2|111,000|83,000|1,086|9,000|38|100,000|2 hours |
||
| − | |3|118,000|88,000|1,197|9,900|39|200,000|5 hours |
||
| − | |4|125,000|94,000|1,314|10,900|40|400,000|14 hours |
||
| − | |5|133,000|100,000|1,446|12,000|41|2,000,000|1 days 4 hours |
||
| − | |6|142,000|106,000|1,593|13,200|43|4,000,000|2 days 18 hours |
||
| − | |7|151,000|113,000|1,752|14,550|44|6,000,000|4 days 6 hours |
||
| − | |8|161,000|120,000|1,926|16,000|45|11,000,000|5 days 4 hours |
||
| − | |9|171,000|128,000|2,118|17,600|46|17,000,000|5 days 20 hours |
||
| − | |10|182,000|136,000|2,331|19,400|46|36,000,000|6 days 4 hours |
||
| − | |11|194,000|145,000|2,565|21,300|45|52,000,000|6 days 12 hours |
||
| − | |12|206,000|154,000|2,820|23,400|45|70,000,000|6 days 20 hours |
||
| − | |total-upgrade-cost = 198,700,000 |
||
| − | |total-upgrade-time = 39 days 13 hours}} |
||
| + | ==Upgrade Cost== |
||
| − | ==Mark II Statistics== |
||
| − | {{Robot |
+ | {{Robot Tier3}} |
| + | * NOTE: base level starts at level 1 cost is <!--10,000 {{Cp icon}} --> |
||
| − | |additional-columns = 3 |
||
| + | * MK2 Upgrade cost 500 {{Au icon}} |
||
| − | |mark-2 = true |
||
| + | |||
| − | |custom-ico-1 = [[File:PhysicalShield icon.png|32px|link=]] |
||
| + | ==Stats== |
||
| − | |custom-title-1 = Physical Shield |
||
| + | {{MasterRobot|Tyr}} |
||
| − | |custom-ico-2 = [[File:SelfRepairinfobox.png|40px|link=]] |
||
| + | |||
| − | |custom-title-2 = Repair (per second) |
||
| + | ===Constant Healing Stats=== |
||
| − | |custom-ico-3 = [[File:SelfRepairinfobox.png|40px|link=]] |
||
| + | {{MasterAbility|Tyr HealthAbility}} |
||
| − | |custom-title-3 = Repair Impulse |
||
| + | |||
| − | |1|206,000|154,000|2,820|23,400|45|500 |
||
| + | ===Healing Burst Stats=== |
||
| − | |2|209,800|156,800|2,874|23,430|46|2,500,000|1 day |
||
| + | Note: From comparing the cycle DPS of the two methods of healing, it can be concluded that '''shifting between Support Mode and Attack Mode is the fastest method''' of healing, and also dealing damage. |
||
| − | |3|213,600|159,600|2,928|23,860|46|5,000,000|2 days |
||
| + | {{MasterAbility|Tyr Health Once Ability}} |
||
| − | |4|217,400|162,400|2,982|24,290|46|10,000,000|3 days |
||
| + | |||
| − | |5|221,200|165,200|3,036|24,720|46|22,500,000|4 days |
||
| + | ===Shield Stats=== |
||
| − | |6|225,000|168,000|3,090|25,150|46|22,500,000|4 days |
||
| + | {{MasterShield|Tyr}} |
||
| − | |7|228,800|170,800|3,144|25,580|46|22,500,000|4 days |
||
| − | |8|232,600|173,600|3,198|26,010|46|22,500,000|4 days |
||
| − | |9|236,400|176,400|3,252|?|46|22,500,000|4 days |
||
| − | |10|240,200|179,200|3,306|?|46|22,500,000|4 days |
||
| − | |11|244,000|182,000|3,360|?|46|22,500,000|4 days |
||
| − | |12|247,800|184,800|3,414|28160|46|22,500,000|4 days |
||
| − | |total-upgrade-cost = 170,000,000 |
||
| − | |total-upgrade-time = 38 days}} |
||
==Gallery== |
==Gallery== |
||
| + | {{Gallery - Resize Notice}} |
||
| − | <gallery position="center" orientation="none" spacing=" |
+ | <gallery position="center" orientation="none" spacing="small" widths="200" captionalign="center" captionsize="small" bordercolor="#d235ca" bordersize="small"> |
| − | Tyr.jpg|Tyr |
+ | Tyr.jpg|Tyr official poster |
| − | Tyr.png |
||
| + | War Robots 5-Year Anniversary EVENT Trailer (2019)|Tyr official teaser |
||
| + | War Robots Overview- Ragnarok Squad -Tyr, Fenrir Loki- (new robots)|Tyr official overview |
||
| + | Fenrir 5th anniversary.jpeg|Tyr armed with dual [[Storm|Storms]] and a [[Halo]] as seen in a 5th Anniversary loading screen |
||
</gallery> |
</gallery> |
||
| Line 264: | Line 247: | ||
!Version |
!Version |
||
!Changes |
!Changes |
||
| + | |- |
||
| + | |[[Updates#update 7.9.0|7.9.0]] |
||
| + | |Repair capacity: ↑ 15% |
||
| + | |- |
||
| + | |[[Updates#update 6.3.0|6.3.0]] |
||
| + | |Repairs per second: ↑ 20% |
||
|- |
|- |
||
|[[Updates#Update 6.0.1|6.0.1]] |
|[[Updates#Update 6.0.1|6.0.1]] |
||
| Line 291: | Line 280: | ||
*During the binding of Fenrir, Tyr had his hand bitten off. |
*During the binding of Fenrir, Tyr had his hand bitten off. |
||
*This robot was added on April 25, 2019. |
*This robot was added on April 25, 2019. |
||
| + | *There existed a bug with the physical shield on the Ancient Tyr during the remastered test servers. It made the physical shield impenetrable no matter how much damage it takes. The bug ceased to exist after Pixonic removed Ancient Tyr from the remastered test servers in later sessions. |
||
==Navigation== |
==Navigation== |
||
{{Units}} |
{{Units}} |
||
[[Category:A to Z]] |
[[Category:A to Z]] |
||
| + | [[Category:Medium Robot]] |
||
Latest revision as of 16:23, 18 February 2024
| THIS IS A COMMUNITY PAGE IT IS OPEN TO EDITS FROM ANYONE |  |
| Tyr | Ancient Tyr |

| “ | In Support mode, this balanced robot is able to move fast around the battlefield, repairing itself and nearby allies. When in Assault mode, it increases its own combat efficiency and defenses
|
” |
- — in-game description
| QUICK NAVIGATION | ||||
|---|---|---|---|---|
| << PREV | Loki | T | Fenrir | NEXT >> |
| 53 | Tyr
|
| Purchase Information | 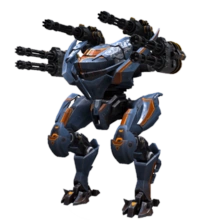
| ||||
|---|---|---|---|---|---|
| In-Game Cost | Real Value |
Exp Level | |||
| 10,000 9,500 |
$95 | 20 | |||
| Robot Information | |||||
| Class |
Ability |
Faction | |||
Medium |
Shapeshift |
EvoLife | |||
| Base Statistics | |||||
Level |
Durability |
Speed | |||
| 1 | 104,000 | 36 kph | |||
| Armaments | Standard Paint Jobs | ||||
| Hardpoints | 2× Light + 2x Medium | ||||
| Default Weapons | 2× Punisher + 2x Punisher T | ||||
| Module Slots | Legendary Paint Jobs | ||||
| Active | Yes | ||||
| Passive | 3 | ||||
| Other | Legendary Pilots | ||||
| Tier |
III | 
| |||
| Wiki Class |
Medium | ||||
| Potential Role | Support | ||||
| Workshop Production Information | |
|---|---|
| 1 Day Cost |
3 Day Cost |
| 290,000 | 950,000 |
| Components |
Components |
| 60 | 170 |
Introduction
Tyr is a medium robot with 2 medium and 2 light hardpoints.
Ability
The Tyr's ability is called Shapeshift. Upon activation, the Tyr toggles its mode. The Tyr has two modes: Support Mode and Assault Mode.
Upon activation of the Support Mode the Tyr sends out a single repair impulse (akin to the Mender) that instantly repairs itself and all ally robots within 75 meters a fixed amount (based on the Tyr's level) of durability. While in Support Mode the Tyr deploys a repair aura (akin to the Weyland) allowing it to heal both itself and allies (within 75 meters) slowly over time, while also granting this robot a speed boost of +15 km/h. However, its light weapons are disabled and fold back (cannot be fired).
In Assault Mode the Tyr deploys a physical shield allowing it to block projectiles and activates its light weapons but loses the speed boost and the ability to repair. When switching back to Support Mode it retracts its physical shield.
Strategy
Since Tyr has the ability to heal itself and allies it is recommended to stay close to teammates. Overall, the Tyr is capable of filling multiple roles but it best used as a close range support bot or brawler to make full use use of its physical shield, firepower, and repairing capabilities to both heal itself and allies. With 2x medium and 2x light hardpoints the Tyr can also do well for mid-range support and skirmishing.
A good strategy that should be employed is to serve as the leader of a mobile strike team, ideally consisting of other robots that will provide useful to the team, such as Hades or Blitz. When in combat, the player should activate Assault Mode to utilize the physical shield in order to protect the hull of the Tyr, not to mention the extra firepower. Once the skirmish is over, however, Tyr should return to Support Mode to heal itself and the other members of the strike team.
Important: A very easy way to maximize healing power is to constantly toggle the ability change, as the explosive repair pulse created while changing into Support Mode can heal faster than staying in Support Mode! While it generally means your Tyr is slower if moving (due to the time spent in Assault Mode), spamming Shapeshift heals much faster than slowly waiting for the repair aura to heal you and your allies up.
Note: The Tyr's built-in physical shield can still take damage even when inactive due to the fact the shield doesn't retract into the robot's hull. The shield most likely can take damage from area of effect (splash) weapons when inactive, however, in rare instances it can take damage from any weapon type if shot at the correct angle.
It should also be noted that even though the shield is made up of two separate parts they share the same durability pool. This means if one part of the shield takes damage the other part does as well. The Limited Edition "Ancient" Tyr is further enhanced by a +10% Armor boost.
Possible Setups
Some effective setups for the Tyr are:
Note: When "Opt." is next to a slot type, it refers to one of the multiple options that can be used in combination with the other weapon(s) slot type(s).
Each slot type is filled with only one particular weapon. For example, if a robot has 3 light all three of those slots are filled with Pinatas, as mixing weapons of the same slot type is usually not advisable.
However, utility weapons can be effectively mixed with standard weaponry, for example the Halo (a root weapon) could be used on one light slot, and a Gust on another. This is because weapons such as the Halo give up firepower for the utility of locking down enemies.
Close Range (350m or less)


Mid-Range (500-600m)
| Slot Types → | Medium Slot ↓ | Light Slot (Opt. 1) ↓ | Light Slot (Opt. 2) ↓ | Light Slot (Opt. 3) ↓ | Light Slot (Opt. 4) ↓ | ||
| #Slots → | x2 | x2 | x2 | x2 | x2 | Name (If Applicable) ↓ | |
| Setup 1 → |  |
 |
 |
 |
|||
| Setup 2 → |  |
 |
|
|
|||
| Setup 3 → |  |
 |
Russian Death Button |
Overview
Recommended equipment includes:
These weapons allow it to lock-down enemies from a distance or provide decent damage, with the Scourge/Spark load-out allowing it to brawl up close without sacrificing range.
Upgrade Cost
- NOTE: base level starts at level 1 cost is
- MK2 Upgrade cost 500

Stats
| ID | 53 | Ability | Faction | |||||||||||||||||||||||||||||||||||||||||||||||||||||||||||||||||||||||||||
|---|---|---|---|---|---|---|---|---|---|---|---|---|---|---|---|---|---|---|---|---|---|---|---|---|---|---|---|---|---|---|---|---|---|---|---|---|---|---|---|---|---|---|---|---|---|---|---|---|---|---|---|---|---|---|---|---|---|---|---|---|---|---|---|---|---|---|---|---|---|---|---|---|---|---|---|---|---|---|
| Tier | 3 |  Shapeshift |
 Evolife | |||||||||||||||||||||||||||||||||||||||||||||||||||||||||||||||||||||||||||
| Class | Medium | |||||||||||||||||||||||||||||||||||||||||||||||||||||||||||||||||||||||||||||
| Wiki Class |
Medium | |||||||||||||||||||||||||||||||||||||||||||||||||||||||||||||||||||||||||||||
| Availability | ||||||||||||||||||||||||||||||||||||||||||||||||||||||||||||||||||||||||||||||
| ||||||||||||||||||||||||||||||||||||||||||||||||||||||||||||||||||||||||||||||
Constant Healing Stats
| ID | Robot | Type | Range | Cooldown | Duration | |||||||||||||||||||||||||||||||||||||||||||||||||||||||||||||||||||||||||||||||||||||||||||||||||||||||||||||||||||||||||||||||||||||||||||||||||||||||
|---|---|---|---|---|---|---|---|---|---|---|---|---|---|---|---|---|---|---|---|---|---|---|---|---|---|---|---|---|---|---|---|---|---|---|---|---|---|---|---|---|---|---|---|---|---|---|---|---|---|---|---|---|---|---|---|---|---|---|---|---|---|---|---|---|---|---|---|---|---|---|---|---|---|---|---|---|---|---|---|---|---|---|---|---|---|---|---|---|---|---|---|---|---|---|---|---|---|---|---|---|---|---|---|---|---|---|---|---|---|---|---|---|---|---|---|---|---|---|---|---|---|---|---|---|---|---|---|---|---|---|---|---|---|---|---|---|---|---|---|---|---|---|---|---|---|---|---|---|---|---|---|---|---|---|---|---|
| 15 | Tyr | Explosive | 0 (AOE: 75) | 5 | 0 | |||||||||||||||||||||||||||||||||||||||||||||||||||||||||||||||||||||||||||||||||||||||||||||||||||||||||||||||||||||||||||||||||||||||||||||||||||||||
| Ammo | Particles per Shot |
Unload Time | Reload Time | Shot Interval |
Rate of Fire | |||||||||||||||||||||||||||||||||||||||||||||||||||||||||||||||||||||||||||||||||||||||||||||||||||||||||||||||||||||||||||||||||||||||||||||||||||||||
| 1 | 0 | 0 | 0.33 | ¡Þ (sub: 1) | ~ | |||||||||||||||||||||||||||||||||||||||||||||||||||||||||||||||||||||||||||||||||||||||||||||||||||||||||||||||||||||||||||||||||||||||||||||||||||||||
| ||||||||||||||||||||||||||||||||||||||||||||||||||||||||||||||||||||||||||||||||||||||||||||||||||||||||||||||||||||||||||||||||||||||||||||||||||||||||||||
| ||||||||||||||||||||||||||||||||||||||||||||||||||||||||||||||||||||||||||||||||||||||||||||||||||||||||||||||||||||||||||||||||||||||||||||||||||||||||||||
| ||||||||||||||||||||||||||||||||||||||||||||||||||||||||||||||||||||||||||||||||||||||||||||||||||||||||||||||||||||||||||||||||||||||||||||||||||||||||||||
Healing Burst Stats
Note: From comparing the cycle DPS of the two methods of healing, it can be concluded that shifting between Support Mode and Attack Mode is the fastest method of healing, and also dealing damage.
| ID | Robot | Type | Range | Cooldown | Duration | |||||||||||||||||||||||||||||||||||||||||||||||||||||||||||||||||||||||||||||||||||||||||||||||||||||||||||||||||||||||||||||||||||||||||||||||||||||||
|---|---|---|---|---|---|---|---|---|---|---|---|---|---|---|---|---|---|---|---|---|---|---|---|---|---|---|---|---|---|---|---|---|---|---|---|---|---|---|---|---|---|---|---|---|---|---|---|---|---|---|---|---|---|---|---|---|---|---|---|---|---|---|---|---|---|---|---|---|---|---|---|---|---|---|---|---|---|---|---|---|---|---|---|---|---|---|---|---|---|---|---|---|---|---|---|---|---|---|---|---|---|---|---|---|---|---|---|---|---|---|---|---|---|---|---|---|---|---|---|---|---|---|---|---|---|---|---|---|---|---|---|---|---|---|---|---|---|---|---|---|---|---|---|---|---|---|---|---|---|---|---|---|---|---|---|---|
| 16 | Tyr | Explosive | 0 (AOE: 75) | 5 | 0 | |||||||||||||||||||||||||||||||||||||||||||||||||||||||||||||||||||||||||||||||||||||||||||||||||||||||||||||||||||||||||||||||||||||||||||||||||||||||
| Ammo | Particles per Shot |
Unload Time | Reload Time | Shot Interval |
Rate of Fire | |||||||||||||||||||||||||||||||||||||||||||||||||||||||||||||||||||||||||||||||||||||||||||||||||||||||||||||||||||||||||||||||||||||||||||||||||||||||
| 1 | 1 | 0 | 5 | 0 | ~ | |||||||||||||||||||||||||||||||||||||||||||||||||||||||||||||||||||||||||||||||||||||||||||||||||||||||||||||||||||||||||||||||||||||||||||||||||||||||
| ||||||||||||||||||||||||||||||||||||||||||||||||||||||||||||||||||||||||||||||||||||||||||||||||||||||||||||||||||||||||||||||||||||||||||||||||||||||||||||
| ||||||||||||||||||||||||||||||||||||||||||||||||||||||||||||||||||||||||||||||||||||||||||||||||||||||||||||||||||||||||||||||||||||||||||||||||||||||||||||
| ||||||||||||||||||||||||||||||||||||||||||||||||||||||||||||||||||||||||||||||||||||||||||||||||||||||||||||||||||||||||||||||||||||||||||||||||||||||||||||
Shield Stats
| MK 1 | Level | MK 2 | ||||||||
|---|---|---|---|---|---|---|---|---|---|---|
| Durability | Durability | |||||||||
| 78,000 | 1 | 154,000 | ||||||||
| 83,000 | 2 | 156,800 | ||||||||
| 88,000 | 3 | 159,600 | ||||||||
| 94,000 | 4 | 162,400 | ||||||||
| 100,000 | 5 | 165,200 | ||||||||
| 106,000 | 6 | 168,000 | ||||||||
| 113,000 | 7 | 170,800 | ||||||||
| 120,000 | 8 | 173,600 | ||||||||
| 128,000 | 9 | 176,400 | ||||||||
| 136,000 | 10 | 179,200 | ||||||||
| 145,000 | 11 | 182,000 | ||||||||
| 154,000 | 12 | 184,800 | ||||||||
| MK 3 Level 1 | 194,040 | |||||||||
Gallery
Images may have been resized to fit in the page. Click on an image to view actual size.
")
 (40 KB)")
 (40 KB)")
")
Update History
| Version | Changes |
|---|---|
| 7.9.0 | Repair capacity: ↑ 15% |
| 6.3.0 | Repairs per second: ↑ 20% |
| 6.0.1 | Now available for 14,000 gold (can still be produced via Workshop 2.0) |
| 5.7.2 | Ancient model bonus durability increased from 5% → 10% |
| 5.6.0 | Now launches additional repairing pulse after switching into Support Mode |
| 5.5.0 | Ancient model gained 5% bonus durability |
| New alternative model: Ancient Tyr (Operation: Raging Typhoon) | |
| 5.4.0 | New skin: Tsunami (Yan-di Showdown) |
| 5.0.0 | Robot was added to the game |
Trivia
- In Norse Mythology, Tyr is the god of war and justice.
- During the binding of Fenrir, Tyr had his hand bitten off.
- This robot was added on April 25, 2019.
- There existed a bug with the physical shield on the Ancient Tyr during the remastered test servers. It made the physical shield impenetrable no matter how much damage it takes. The bug ceased to exist after Pixonic removed Ancient Tyr from the remastered test servers in later sessions.